
In this post, we’ll explore the different extensions available for Copilot in Dynamics 365 Sales using Copilot Studio. We’ll go through the welcome message, custom Sparkle Menu groups, building your own topics, and how to use context so Copilot actually knows what record you’re working on.
Quick note: if you’re after an overview of Copilot for Sales (the one that lives in Outlook and Teams), I wrote about that already. Check out Extending Copilot for Sales with Copilot Studio — A Practical Guide to Custom Extensions for that.
This post comes from my PPCC session — I wanted to document everything for those who couldn’t make it.
Copilot in Sales: Key Capabilities
Copilot in Sales comes with powerful out-of-the-box capabilities that help sellers work more efficiently:
- Record Summarization: Quickly summarizes account, lead, and opportunity records—giving you a digest of the most relevant fields so you can see status without digging through everything.
- Recent Changes Tracking: Highlights what’s changed recently on your key records (leads, opportunities, accounts) so you don’t miss anything important.
- Meeting Preparation Assistance: Pulls together relevant history, talking points, agendas, and context ahead of meetings. Helps you show up prepared.
- Email Assistance & Summaries: Helps with drafting emails, follow-ups, summarizing threads, and saving summaries to the CRM.
- Natural Language Interaction & Queries: You can ask Copilot questions in plain English (or your language) about your data—for example, “show me opportunities closing next month”—and get answers without navigating deep menus.
Now, all of this is nice. But here’s the thing — with Copilot Studio, you can push it further.
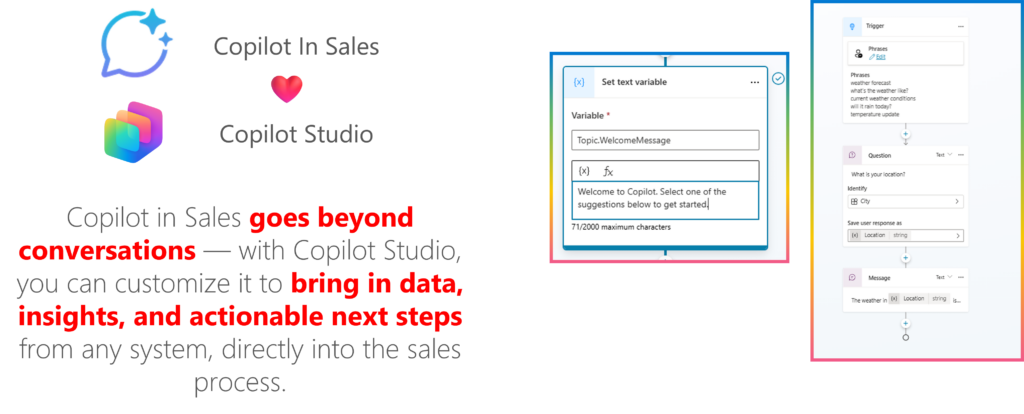
Copilot in Sales works hand-in-hand with Copilot Studio. You can bring in your own data, your own prompts, your own logic. That’s what makes it interesting.
Copilot in Sales: Experiences
When users interact with Copilot in Sales, they encounter several distinct experiences that you can customize:
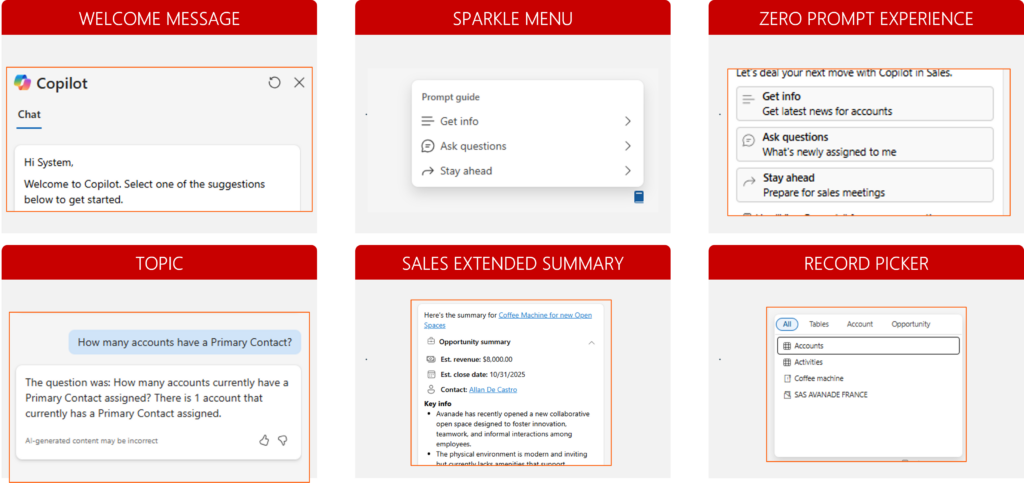
- Welcome Message — First thing users see. Default is pretty generic. You’ll probably want to change this.
- Sparkle Menu (Prompt Guide) — That little menu that pops up with suggestions like “Get info” or “Ask questions.” You can add your own categories here. This is one of the most impactful customizations you can make.
- Zero Prompt Experience — The suggestions that show up before the user types anything. Things like “Get latest news for accounts” or “Prepare for sales meetings.”
- Topic — When users ask something specific, Copilot matches it to a topic. You can create custom topics to handle queries that are specific to your business.
- Sales Extended Summary — The detailed summaries you see for records. Shows revenue, close dates, contacts, key info.
- Record Picker — Users type “/” to pick a specific record. Uses Dataverse search under the hood.
Getting Started with Extensibility
Alright, let’s get into it. First thing you need to do: add the agent to your solution.
Add the Agent to Your Solution
This is step zero. Don’t skip it.
- Go to make.powerapps.com
- Pick your environment, open your solution
- Click Add existing → Agent → Agent
- Select Copilot in Dynamics 365 Sales
- Hit Add
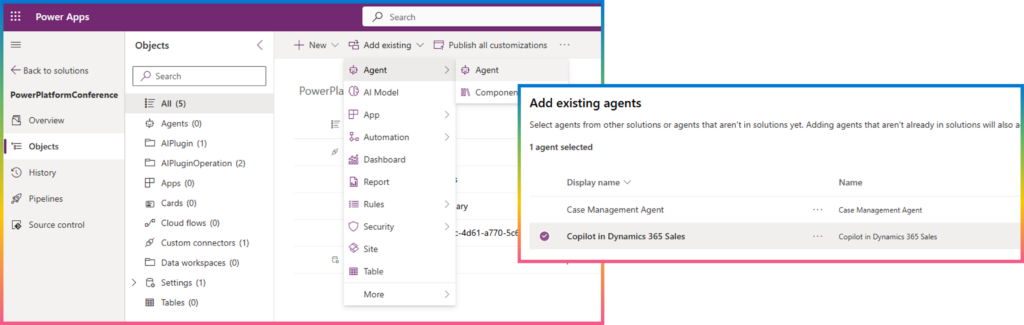
Now you can track your customizations in source control and deploy through pipelines. The usual ALM stuff.
⚠️ One thing to know: the agent is managed. You can add new topics, but you can’t touch the existing ones unless Microsoft allows it.
Customizing the Welcome Message
The welcome message is low-hanging fruit. Easy to change, nice impact.
Where to find it:
- Open Copilot Studio
- Find the Copilot in Dynamics 365 Sales agent
- Go to Topics
- Filter to System topics
- Open Conversation Start
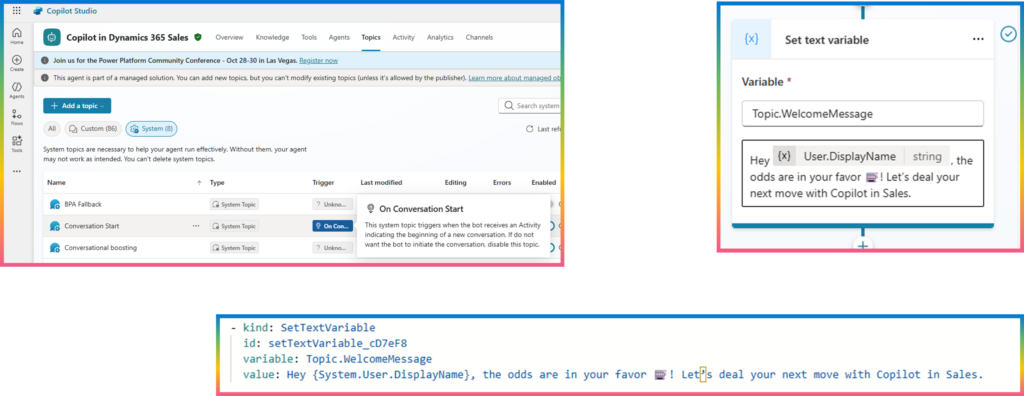
Look for the SetTextVariable action that sets Topic.WelcomeMessage. Here’s what the YAML looks like:
- kind: SetTextVariable
  id: setTextVariable_cD7eF8
  variable: Topic.WelcomeMessage
  value: Hey {System.User.DisplayName}, the odds are in your favor 🃏! Let's deal your next move with Copilot in Sales.
Use {System.User.DisplayName} to make it personal. Add whatever message fits your org, you can even imagine displaying the next updates of your system.
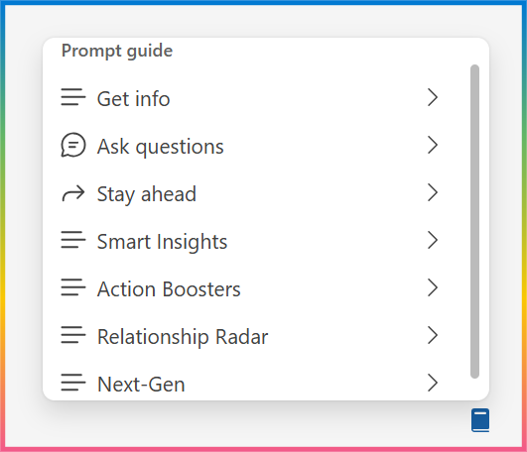
Customizing the Sparkle Menu (Prompt Guide)
This is where it gets fun. The Sparkle Menu is what users see when they click that 📘 icon. Out of the box, you get “Get info,” “Ask questions,” “Stay ahead.” But you can add your own groups.
The main idea here is to make Copilot more intuitive and more actionable — not just reactive. So, we’ve created a Custom Spark Menu organized into four key groups: Smart Insights, Action Boosters, Relationship Radar, and Next-Gen. Each of these groups focuses on specific user needs. For example, Smart Insights helps analyze data instantly, Action Boosters accelerate routine sales tasks, Relationship Radar strengthens customer connections, and Next-Gen introduces forward-looking capabilities like predictive guidance.
What’s really powerful is that every spark delivers immediate, actionable insights — all with a single click. The experience is designed to be fast, visual, and interactive. Behind the scenes, prompts are context-aware — they adapt to the user’s current workflow. That means less complexity, more productivity, and a smoother experience overall.
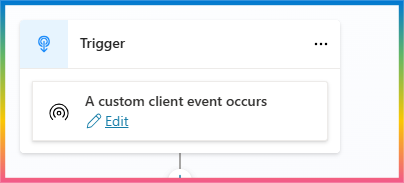
How it works under the hood
The Sparkle Menu runs on events. When someone clicks the Copilot icon, it fires Microsoft.PowerApps.Copilot.RequestSparks. Your custom dialog catches that event.
kind: AdaptiveDialog
beginDialog:
    kind: OnEventActivity
    id: main
    priority: 20
    eventName: Microsoft.PowerApps.Copilot.RequestSparks
Step 1: Define your spark groups
You create a ParseValue action to define your groups. This stores your custom groups in Global.MyCustomSparksGroup. You define the group names, the individual sparks inside each group, icons, all of it.
- kind: ParseValue
  id: XcxspA
  variable: Global.MyCustomSparksGroup
  valueType: Table
  value: "[your JSON here]"
This is what I used in my example:
[
{
"displayName": "Smart Insights",
"displaySubtitle": "Turn data into recommendations",
"iconName": "List24Regular",
"sparks": [
{
"displayName": "Deal Pulse",
"type": "PromptText"
},
{
"displayName": "AI Forecast",
"type": "PromptText"
}
]
},
{
"displayName": "Action Boosters",
"displaySubtitle": "Reduce clicks. Close faster.",
"iconName": "List24Regular",
"sparks": [
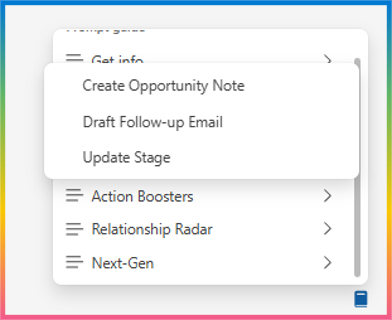
{
"displayName": "Draft Follow-up Email",
"type": "PromptText"
},
{
"displayName": "Create Opportunity Note",
"type": "PromptText"
},
{
"displayName": "Update Stage",
"type": "EventActivity"
}
]
},
{
"displayName": "Relationship Radar",
"displaySubtitle": "Strengthen customer connections",
"iconName": "List24Regular",
"sparks": [
{
"displayName": "Customer Sentiment",
"type": "PromptText"
},
{
"displayName": "Top Stakeholders",
"type": "PromptText"
}
]
},
{
"displayName": "Next-Gen",
"displaySubtitle": "Accelerate enablement & collaboration",
"iconName": "List24Regular",
"sparks": [
{
"displayName": "Best Practices Hub",
"type": "PromptText"
},
{
"displayName": "Team Summary",
"type": "PromptText"
}
]
}
]
Step 2: Assign them to the topic
Without this, Copilot won’t show your groups. It needs to know what to render for this session.
- kind: SetVariable
  id: setVariable_kaE01k
  variable: Topic.SparkGroups
  value: =Global.MyCustomSparksGroup
Step 3: Merge with existing sparks
You probably don’t want to blow away the default sparks. Here’s how to keep them and add yours:
- kind: SetVariable
  id: setVariable_9PFCUk
  variable: Global.PA_Copilot_Sparks.sparkGroups
  value: =ForAll(
      Sequence(CountRows(Global.PA_Copilot_Sparks.sparkGroups)+CountRows(Topic.SparkGroups)),
      If(
          Value <= CountRows(Global.PA_Copilot_Sparks.sparkGroups),
          Index(Global.PA_Copilot_Sparks.sparkGroups, Value),
          Index(Topic.SparkGroups, Value - CountRows(Global.PA_Copilot_Sparks.sparkGroups))
      )
  )
Looks complicated, but it’s just: keep the existing ones, then append yours at the end 😊
Creating Custom Topics
Sometimes you need Copilot to do something specific that isn’t covered out of the box. That’s where custom topics come in. This is a good way to try to minimize action in the application by just using the chat (especially in mobility).
Example: Adding notes to opportunities
Let’s say your team wants to quickly add notes to opportunities through Copilot. Natural phrases like:
- “add note to opportunity”
- “leave a comment on an opportunity”
- “save a message for this opportunity”
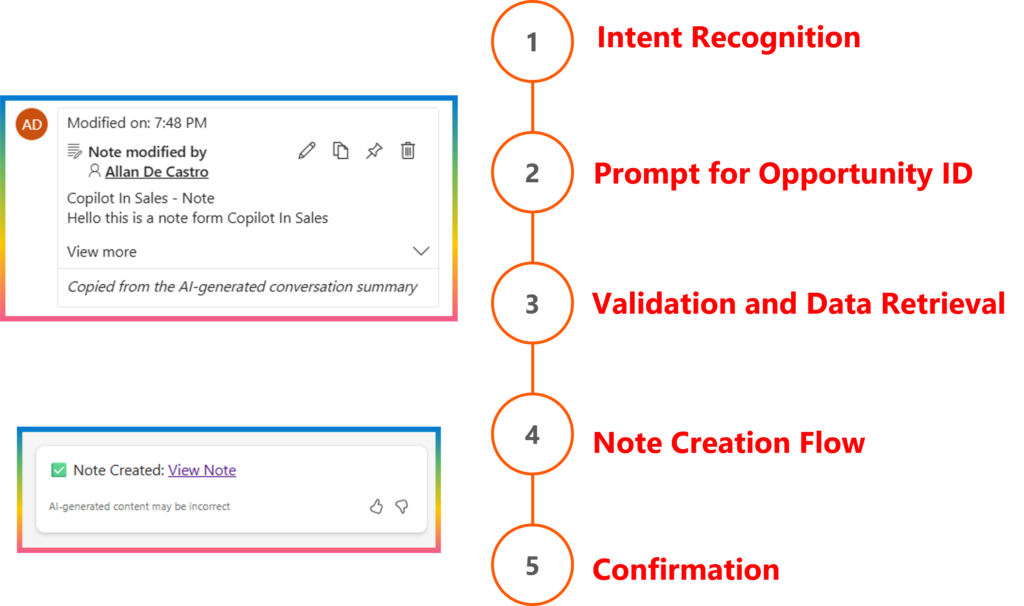
- Intent Recognition — Copilot catches the phrase and routes to your topic
- Get the Opportunity — If there’s no context, ask which opportunity
- Validate — Make sure it exists
- Create the Note — Prompt for the content, create the record
- Confirm — Show a success message with a link
The note ends up in Dataverse, linked to the opportunity, with the current user as creator. Simple.
Context and Record Picker
When extending Copilot in Sales, providing context ensures that Copilot understands where and what the user is working on. Context allows Copilot to tailor its responses and actions to the current record, enabling more relevant insights and suggestions. The Record Picker complements this by letting users explicitly select the record they want Copilot to focus on. Together, context passing and the record picker create a more guided, accurate, and personalized Copilot experience—helping sellers stay focused while Copilot adapts intelligently to their workflow.
You get context from two places to get your record:
- Page context — what form the user is currently viewing
- Global.PA__Copilot_Model_PageContext.pageContext
- Record Picker — user explicitly picks a record by typing “/”
You can also have detail about the app you’re using (very useful, especially when you customize your agent in an environment with multiple MDAs):
Global.PA__Copilot_Model_AppUniqueNameContext.appUniqueName
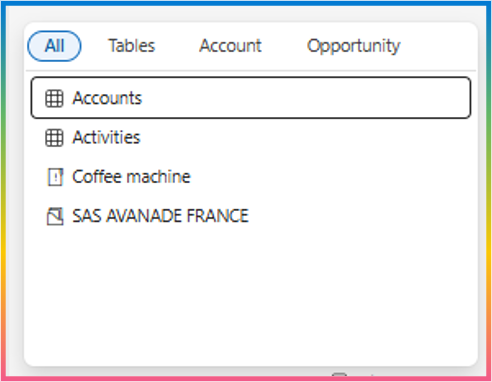
Users type “/” and get a search box. It uses Dataverse search, so if your entity isn’t showing up, you need to add it to the search index.
Useful functions when working with Record Picker:
Global.PA_Copilot_DVRecordContext

First(Global.PA_Copilot_DVRecordContext).EntityName="account"
First(Global.PA_Copilot_DVRecordContext).RecordId
CountRows(Global.PA_Copilot_DVRecordContext)<>1
Last(Global.PA_Copilot_DVRecordContext).Record
Between page context and record picker, you can build topics that actually know what the user is working on.
Example: Creating Cases with Context
Let me walk through a scenario I built that ties all of this together.
When receiving a call from a customer whose contact is not yet identified in the system, the agent first validates the caller’s identity. Once confirmed, the agent needs to:
- Create a new Case linked to the appropriate Account.
- Create the Contact record representing the individual caller.
- Establish the relationship between the Account and the Contact, categorized through a custom relationship type (as contacts in our business can exist as independent individuals).
To ensure accuracy and efficiency, the Account context should be leveraged when creating the Case — either directly from the Account form or by selecting the record through the Record Picker.
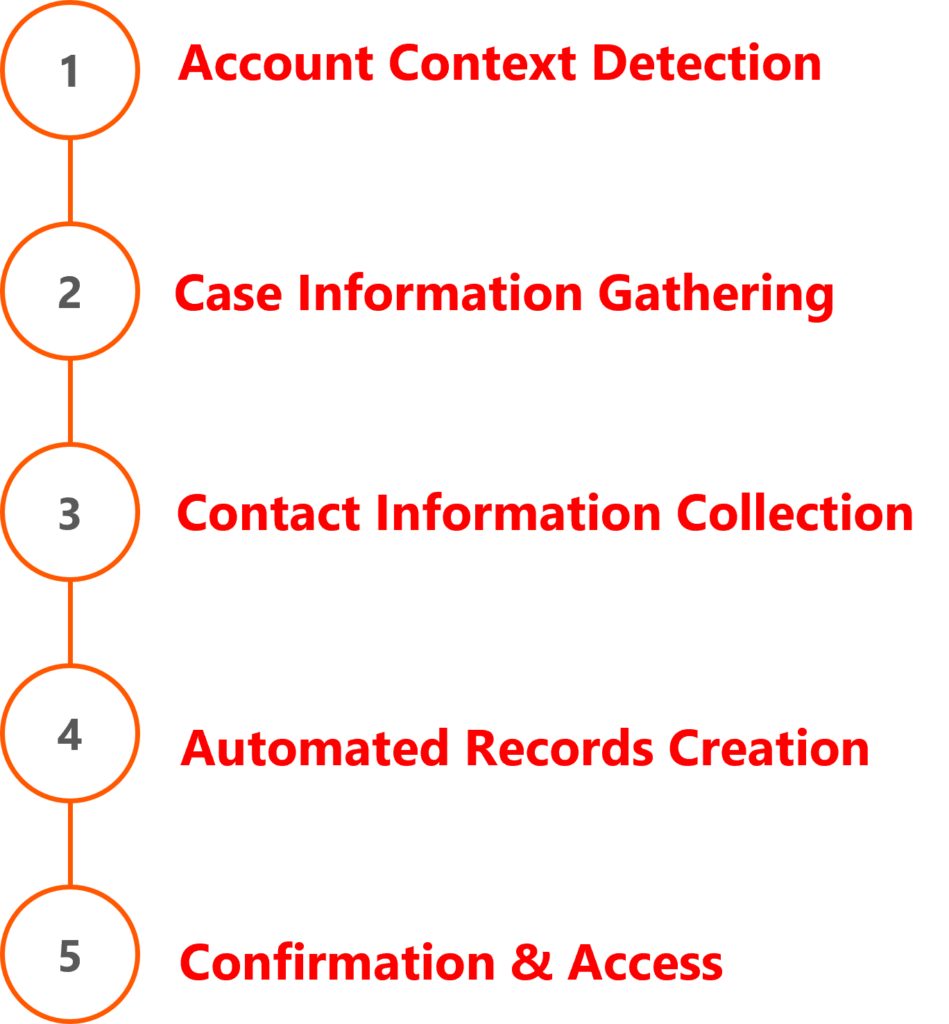
- Account Context Detection: Check if user is on an Account form or has selected an Account via Record Picker
- Case Information Gathering: Prompt for case title, description, and priority
- Contact Information Collection: Gather caller’s name, email, and phone
- Automated Records Creation: Create the Case, Contact, and relationship records in Dataverse
- Confirmation & Access: Provide links to the newly created records
Context Detection Logic:
The key to a seamless experience is detecting where the user’s context is coming from. There are two possible sources: the Record Picker (when users type “/” and select a record) or the Page Context (when users are viewing a specific record form). Our logic checks both scenarios in priority order.
First, we check if the user explicitly selected an account using the Record Picker. The Global.PA_Copilot_DVRecordContext variable holds any record the user selected via “/”. If that record is an account, we grab its ID immediately.
If no Record Picker selection exists, we fall back to checking the Page Context. The Global.PA__Copilot_Model_PageContext variable tells us which record form the user is currently viewing. If they’re on an Account form, we extract the entity ID from there.
If neither context source provides an account, we gracefully prompt the user to select one — ensuring the workflow never fails silently.
If(
    First(Global.PA_Copilot_DVRecordContext).EntityName = "account",
    // User selected an account via Record Picker - use that context
    Set(varAccountId, First(Global.PA_Copilot_DVRecordContext).RecordId),
    // Check if we're on an Account form
    If(
        Global.PA__Copilot_Model_PageContext.pageContext.entityName = "account",
        Set(varAccountId, Global.PA__Copilot_Model_PageContext.pageContext.entityId),
        // No account context - ask user to select one
        // ... prompt user
    )
)
This pattern demonstrates how to build intelligent, context-aware workflows that:
- Reduce manual data entry
- Ensure data integrity (records are properly linked)
- Work seamlessly regardless of how the user provides context
The agent can be on the Account form when they trigger this, or they can type “/” to pick the account. Either way, Copilot knows which account to link everything to.
That’s it. If you build something cool with this, let me know in the comments or hit me up on LinkedIn. Always interested to see what people are doing with Copilot. Let’s deal the next hand together! 🃏
Resources
- Extend Microsoft 365 Copilot for Sales with partner applications (preview) | Microsoft Learn
- Extending Copilot in Sales Part 1
- Extending Copilot in Sales Part 2
- Extending Copilot in Sales Part 3
- Extending Copilot in Sales Part 4
- Extending Copilot in D365 Sales – Part 1 – Dynamics 365 Talk
- Extending Copilot in D365 Sales – Part 2 – Dynamics 365 Talk
- Customize Copilot in Dynamics 365 Sales | Microsoft Learn
- Connect to Dynamics 365 Sales with Model Context Protocol (preview) | Microsoft Learn
- allandecastro/CopilotInSalesExtension

Comments (1)
Extending Copilot in Dynamics 365 Sales with Copilot Studio — Tailor It Your Way – 365 Community Onlinesays:
December 19, 2025 at 2:49 PM[…] Original Post https://www.blog.allandecastro.com/extending-copilot-in-dynamics-365-sales-with-copilot-studio-tailo… […]