As I am a big fan of Azure services and in particular Azure Functions, I recently focused my attention on the possibility to create a custom connector from an Azure service. Indeed, the field of possibilities becomes unlimited once you are able to add an abstraction layer between two services with a custom connector to provide Power Platform makers what they need to take their Power Apps to the next level.
Power Platform Custom Connector
Before getting to the heart of the matter, and especially if you are new to the term “Custom Connector”, it is essential to understand what a Custom Connector is, why you might need to create one, and also the different components of the latter.
What is a Power Platform connector?
The objective of a Custom Connector is to be able to interact easily with an external system/services via a REST API by ignoring, or at least simplifying, the technical aspects and in particular by allowing the handling and the discovery of the various actions/triggers in a visual and very simple way, that’s why we speak about it like a wrapper.
A Connector (Custom or not) contains different actions which can be a GET, POST etc and also triggers (WebHook or polling).
As I write this sentence, there are more than 870 connectors available and usable. When we talk about connectors, we must also keep in mind that some are delivered directly by Microsoft, others by third party solutions (services that know the opportunity of the Power Platform and decide to facilitate the use via an official connector) and finally some by the community but still available directly through Microsoft, this is what we call the Independent Publisher.
If you’re interested to understand how you can certify your connector, feel free to check this page: Get your connector certified!
One of the last things to understand is that a custom connector necessarily uses a connection to interact with the remote service and obviously this authentication part is detailed in the connector, but it is the connection that will carry the connection information.

To put it simply:
- Connector knows the Api’s host and operation details (including how to authenticate).
- Connection knows the credentials and has a reference to the connector to facilitate communication with the web API.
PS: If you want more details about the connections, the connection references and the way to manage them within your environment, please have a look at this blog post: Connections and Connection References explained.
Why should I build a custom connector?
In my opinion, the answer to this question can be divided into two main parts.
Firstly, in order to fill the gap:
Case of a non-existent connector: Let’s imagine that you want to discuss with another system without a need to implement a robust integration layer (scaling, scalability, API Limit, replay process…), in this case it can be quite easy to do it if the API is well documented, and it will allow you to cover a business case really fast.
Case of an existent connector: We know there are many connectors out there, but as mentioned below, a connector is just a wrapper of an API where all the actions are described, so if the connector is not really maintained, does not implement what you want, it can be useful to create a Custom one. The fact that a connector exists, but is not sufficient / advanced enough to do the job you want can be really frustrating. For example, you can implement a connector to add triggers/actions that are not present (e.g. With Dataverse, it is impossible to add the Activity table as a trigger) or add code to handle queries and responses in a cleaner/easier way.
Another objective would be on the reusability of it with two different approaches:
Internally: If you are often faced with the same problems or if you have several projects that can use the same service, you can build it once and reuse it in other components or on other projects.
Externally: Build and Share it within the community and make it usable by all (Independent Publisher).
OpenAPI Specification
Now that we all know what is a Custom Connector and why we want to build one, let’s talk about OpenAPI ! 🙂
You can find many definitions on the web about this, but the official definition explains that the goal is to achieve a standardized, language-agnostic interface for RESTful APIs to make it easy to discover and understand the capabilities of the service and, if done correctly, to interact with that service with minimal implementation logic.
When the OpenAPI specification is well done, then it is possible to generate the associated documentation to display the service details.
Ok great, but why OpenAPI ?
There are a lot of advantages to use Open API when building an API and here are some of them:
- Swagger, expressed using JSON, is an interface description language for describing RESTful APIs.
- Exposed and automatically generated documentation for the API.
- Describe all request parameters and responses supported by the API (at least those you would like to define as discoverable).
- Consumer can understand and communicate with the API with minimal effort
- Power Platform Custom Connector can be created for any web API as long as it’s properly described by an OpenAPI document (my favourite one obviously 🙂 )
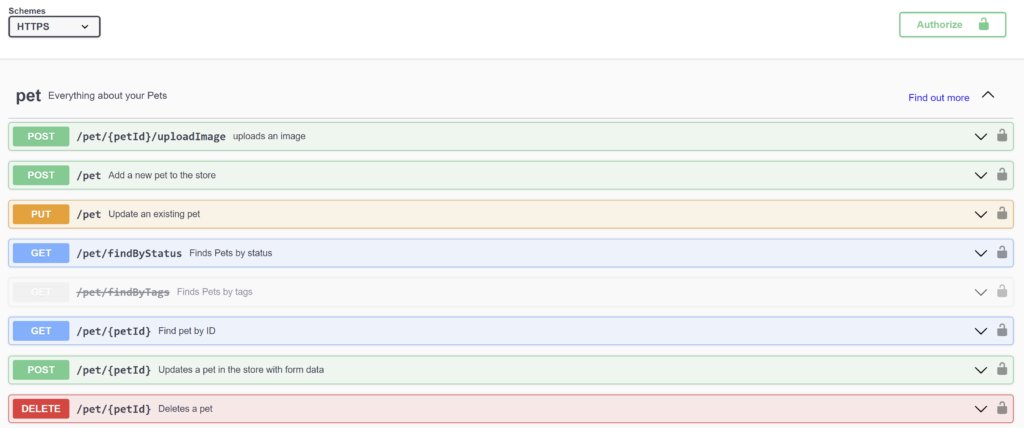
Let’s take some sample of the https://petstore.swagger.io/ Swagger UI:
Below you can see an example of a “PetStore” API showing the different methods for this API:
Let’s do a little deep dive into two different HTTP methods:
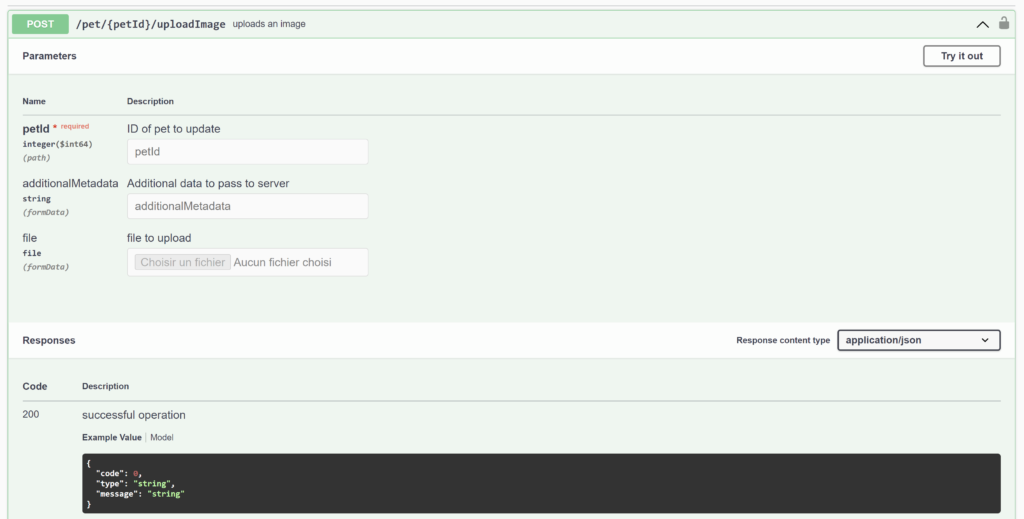
POST: As you can see in the endpoint, there is a {petId} that lets you guess that you have to replace it with the right value for the method to work. If we look in the Settings, we can see that the petId is a required field as an integer, and we can also add additional data and even a file.
At the end, you can also have information about the answers and the body of the answer (very useful for what you will have to analyze).
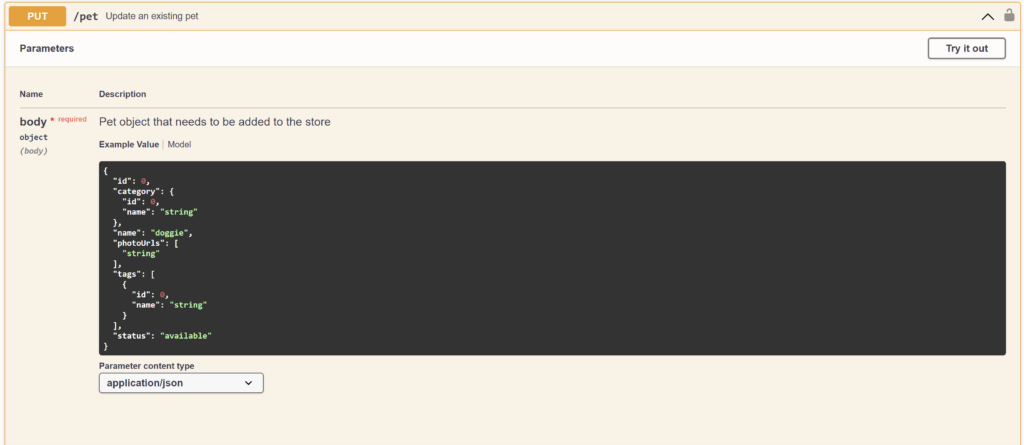
PUT: For this method, you can see that only one parameter is required and must be sent as the content of the request body. This body is required, and we can see that a json schema template is available to understand what we need to send.
Azure Function & OpenAPI
Now let’s start to understand how we can leverage OpenAPI with Azure Function! I will not explain what an Azure Function is because I assume that if you clicked on this blog post you certainly know what it is, but if it’s not the case you can read the first two paragraphs of this article: Extending Common Data Service using Azure Function – Part 1: Introduction.
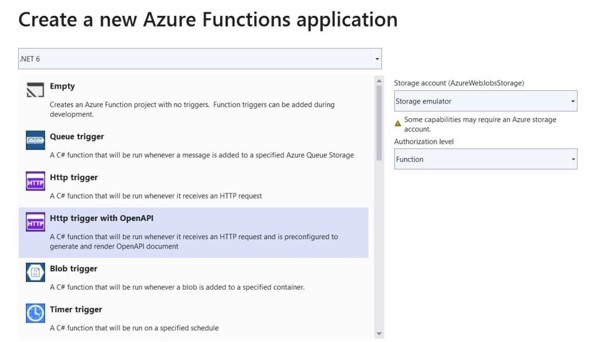
A wonderful news if you’re starting with OpenAPI is that now there is an Azure Function template (check the repo on Github: Azure Functions OpenAPI Extension) for HTTP Trigger which is preconfigured to generate the OpenAPI specification. If you already have an Azure function running, you can of course use the Microsoft.Azure.WebJobs.Extensions.OpenApi nugget.
Using OpenAPI, you must absolutely understand all the properties that you can use to “decorate” your function:
- OpenApiOperation – This maps to “Operation Object” from the OpenAPI Specification.
- OpenApiSecurity – This corresponds to “Security Scheme Object” from the OpenAPI Specification: That what we will use to explain how to authenticate to the target service.
- OpenApiParameter – This corresponds to “Parameter Object” from the OpenAPI Specification: It’s with this one that we will indicate all parameters that can be pass to the target service.
- OpenApiResponseWithBody – This maps to “Responses Object” from the OpenAPI Specification: It is important because it describes the response model that the API will return to the consumer.
- OpenApiProperty – This corresponds to Parameter Object from the OpenAPI Specification. Each field in our class will have the OpenApiProperty attribute.
- OpenApiExample – We use the OpenApiExample attribute to map the sample example with the Request and Response model.
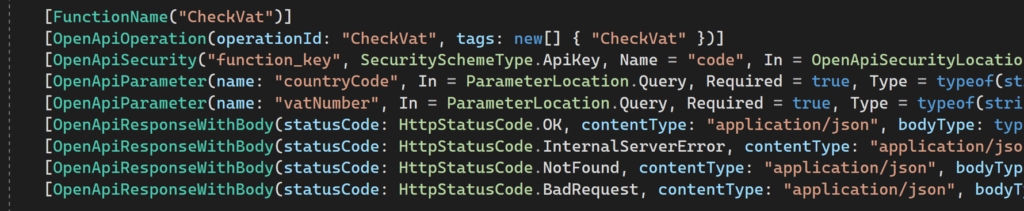
Here is a simple example of an Azure Function decorated with OpenAPI properties:
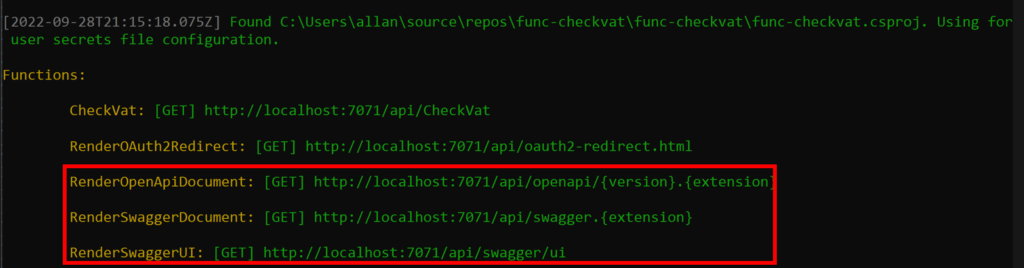
If you have added the nugget package or started with the ready-made template, you will see different endpoints available when running your function locally. This is definitely where you can see the Swagger UI and download it as a json file. Test it! 🙂
Business Case
As you know, I like to be relatively value-added and business-oriented, so we’re going to solve a real-world problem we might encounter in order to demonstrate what using OpenAPI can do.
Let’s imagine the following scenario driven by a product owner, an application expert or simply a sales manager:
My sales team is always using our CRM tool (powered of course by the Power Platform) and we are noticing more and more poor data quality due to the lack of ability to verify the data entered.
We would like to give our sales people the ability to quickly and easily check if a VAT number is valid, which would allow us to reduce our processing time with the Finance team and also to make our salespeople happy.

In the next part, we will go through all the steps of building this custom connector with Azure Function and provide sales people with the necessary information to increase their productivity.

Leave a Reply