
If you have already been able to read the first blog post in this series, you now know why and when to use an Azure Function. If not, I strongly encourage you to read it:
- Episode 1: Extending Common Data Service using Azure Function – Part 1
The aim of this post is to put this concept into practice by implementing both an outgoing and an incoming transaction. To do this, we will first define a precise scenario, then implement both ways of triggering an Azure Function using HTTP Trigger for the outgoing scenario.
Scenario
We are going to consider a simple scenario whose aim will be to manage accounts and contacts. Here are the different scenarios we will deal with:
- Outgoing: Account creation from CDS
- Incoming (not covered in this post): Contact creation from an external entry point, it can come, for example, from a landing page or a third-party system.
Outgoing Scenario
For this scenario, we will look at two ways of triggering an Azure Function from a CDS event, in our case the creation of an Account, using Plugin and WebHook.
Informations we are going to send will be the following:
- Account Name: Required Field
- Account Number: Required Field
- Account Type: Required Field
- Created By (Name): Required Field
- Website: Not Required
Call using CDS plugin
For this option, we will implement an Asynchronous plugin on the Account entity which will aim to retrieve only certain fields from the created Account and then send this information to the Azure Function.
The first thing to do is to set up the plugin for this event which will allow to:
- Make sure that all required fields are present in the Target Entity and the Post Image.
- Make sure that the mandatory fields contain data.
- Create the message using the Target entity and Post Image data.
- Send the message by calling the Azure Function
We will highlight two ways to build our object to send using a DataContract (using System.Runtime.Serialization.Json) and using the Newtonsoft library (using Newtonsoft.Json) which is embedded in the official Microsoft.Xrm.Tooling.Connector package.
So we start by creating our plugin by integrating the PostImage configuration checks and initialising a function to send our message.

        /// <summary>
        /// Method executed in Post Operation Create Asynchronous.
        /// </summary>
        /// <param name="localContext">Local CRM Context</param>
        private void ExecutePostOperationCreateAsync(LocalPluginContext localContext)
        {
            Entity accountEntity = localContext.GetTarget();
            Entity accountPostEntity = localContext.GetPostImage("PostImage"); //Used to retrieve CreatedBy Field because name is not provided in target.

            //Check Entity and Post Image contains all required fields
            if (accountEntity.Contains("name")
                && accountEntity.Contains("accountnumber")
                && accountEntity.Contains("customertypecode")
                && accountPostEntity.Contains("createdby"))
                SendAccountCreationMessage(accountEntity, accountPostEntity);
            else
                throw new InvalidPluginExecutionException("Account Entity does not contain all required fields or Post Image not configured properly.");
        }
We can start writing our function to design our message from the account fields. We’ll make sure that the fields we’ve defined as required contain values before we build our message.
        private void SendAccountCreationMessage(IOrganizationService service, Entity postAccountEntity)
        {
            //Check required fields.
            if (postAccountEntity.GetAttributeValue<OptionSetValue>("customertypecode") != null
                && !string.IsNullOrEmpty(postAccountEntity.GetAttributeValue<string>("name"))
                && !string.IsNullOrEmpty(postAccountEntity.GetAttributeValue<string>("accountnumber"))
                && postAccountEntity.GetAttributeValue<EntityReference>("createdby") != null)
            {
                   //LOGIC HERE
            }
            else
            {
                throw new InvalidPluginExecutionException("Account Post Image fields does not contain values in the required fields. ");

            }
        }
To define the JSON message to be sent its’ better to define an object but we can also simply create the object on the fly without defining these properties.
You will notice that an additional field “CorrelationId” is present in this contract. This field is often used to allow a trace of the operation through Application Insight for example. Here it will be initialized with the record GUID.
Using the Newtonsoft library which is embedded with the Microsoft.CrmSdk.XrmTooling.CoreAssembly nugget package:
    public class AccountMessage
    {
        [JsonProperty("CorrelationId", Required = Required.Always)]
        public string CorrelationId { get; set; }
        [JsonProperty("Name", Required = Required.Always)]
        public string Name { get; set; }
        [JsonProperty("AccountNumber", Required = Required.Always)]
        public string AccountNumber { get; set; }
        [JsonProperty("CreatedBy", Required = Required.Always)]
        public string CreatedBy { get; set; }
        [JsonProperty("AccountType", Required = Required.Always)]
        public int AccountType { get; set; }
        [JsonProperty("WebSiteUrl")]
        public string WebSiteUrl { get; set; }
    }
Once Account object is defined we can create it in the SendAccountCreationMessage function:
                AccountMessage accountMessage = new AccountMessage
                {
                    CorrelationId = accountEntity.Id.ToString(),
                    Name = accountEntity.GetAttributeValue<string>("name"),
                    AccountNumber = accountEntity.GetAttributeValue<string>("accountnumber"),
                    AccountType= accountEntity.GetAttributeValue<OptionSetValue>("customertypecode").Value,
                    CreatedBy = accountPostEntity.GetAttributeValue<EntityReference>("createdby").Name,
                    WebSiteUrl = accountEntity.Contains("websiteurl") ? accountEntity.GetAttributeValue<string>("websiteurl") : string.Empty //Property will be always present.

                };
As I said we could also have built it without declaring a specific object and used the JObject type:
                JObject accountMessage = new JObject
                {
                    ["Name"] = accountEntity.GetAttributeValue<string>("name"),
                    ["AccountNumber"] = accountEntity.GetAttributeValue<string>("accountnumber"),
                    ["AccountType"] = accountEntity.GetAttributeValue<OptionSetValue>("customertypecode").Value,
                    ["CreatedBy"] = accountPostEntity.GetAttributeValue<EntityReference>("createdby").Name,
                    ["CorrelationId"] = accountEntity.Id.ToString(),
                    ["WebSiteUrl"] = accountEntity.Contains("websiteurl") ? accountEntity.GetAttributeValue<string>("websiteurl") : string.Empty //Property will be always present.
                };
In case we use DataContract, we must define the different properties as well as the notion of Required and create the object:
[DataContract]
private class ACCOUNT
{
    [DataMember(Name = "CorrelationId", IsRequired = true)]
    public string CorrelationId { get; set; }
    [DataMember(Name = "AccountName", IsRequired = true)]
    public string Name { get; set; }
    [DataMember(Name = "AccountNumber", IsRequired = true)]
    public string AccountNumber { get; set; }
    [DataMember(Name = "AccountType", IsRequired = true)]
    public int CustomerTypeCode { get; set; }
    [DataMember(Name = "CreatedByName", IsRequired = true)]
    public string CreatedBy { get; set; }
    [DataMember(Name = "WebSite", IsRequired = false)]
    public string WebSiteUrl { get; set; }
}
ACCOUNT accountMessage = new ACCOUNT
{
    Name = accountEntity.GetAttributeValue<string>("name"),
    AccountNumber = accountEntity.GetAttributeValue<string>("accountnumber"),
    CustomerTypeCode = accountEntity.GetAttributeValue<OptionSetValue>("customertypecode").Value,
    CreatedBy = postAccountEntity.GetAttributeValue<EntityReference>("createdby").Name,
    CorrelationId = accountEntity.Id.ToString(),
    WebSiteUrl = accountEntity.Contains("websiteurl") ? accountEntity.GetAttributeValue<string>("websiteurl") : string.Empty
};
Last step is to serialise this object into a string before sending it to the Azure Function.
Using Newtonsoft:
string jsonContent = JsonConvert.SerializeObject(accountMessage, Formatting.Indented);
Using DataContract, we must first implement a generic method <T> which can be used for different messages.
public static string Serialize<T>(T data)
{
    MemoryStream stream = null;
    try
    {
        string json = string.Empty;
        DataContractJsonSerializer serializer = new DataContractJsonSerializer(typeof(T));
        stream = new MemoryStream();
        serializer.WriteObject(stream, data);
        stream.Position = 0;
        using (StreamReader sr = new StreamReader(stream))
        {
            stream = null;
            json = sr.ReadToEnd();
            sr.Close();
        }
        return json;
    }
    catch (Exception e)
    {
        throw new InvalidPluginExecutionException(e.InnerException.Message);
    }
    finally
    {
        stream?.Dispose();
    }
}
Using DataContract and the previous method we can simply generate a Json message containing account’s data by adding the following instruction string jsonContent = Serialize(accountMessage);
In both cases, we will obtain the following result:
{
  "AccountName": "Allan Corp",
  "AccountNumber": "C0001",
  "AccountType": 2,
  "CorrelationId": "4152edb3-8620-eb11-a813-000d3a37def4",
  "CreatedByName": "MOD Administrator",
  "WebSite": "https://blog.allandecastro.com"
}
Note that in the current configuration, if no information is entered in the “websiteurl” field then you get the same JSON but with the WebSite property set to empty (valid for both ways).
We can now create a new method to send the message to the Azure Function:
        /// <summary>
        /// Method used to send a json content to an azure function endpoint.
        /// </summary>
        /// <param name="azureFunctionEndpoint">Azure Function Endpoint.</param>
        /// <param name="jsonContent">JSON content.</param>
        private void SendMessageToAzureFunction(string azureFunctionEndpoint,string jsonContent)
        {
            HttpClient httpClient = new HttpClient
            {
                BaseAddress = new Uri(azureFunctionEndpoint),
                Timeout = new TimeSpan(0, 2, 0),
            };
            httpClient.DefaultRequestHeaders.Add("OData-MaxVersion", "4.0");
            httpClient.DefaultRequestHeaders.Add("OData-Version", "4.0");
            httpClient.DefaultRequestHeaders.Accept.Add(new MediaTypeWithQualityHeaderValue("application/json"));
            HttpRequestMessage request = new HttpRequestMessage(HttpMethod.Post, httpClient.BaseAddress) { Content = new StringContent(jsonContent, Encoding.UTF8, "application/json") };
            httpClient.SendAsync(request);
        }
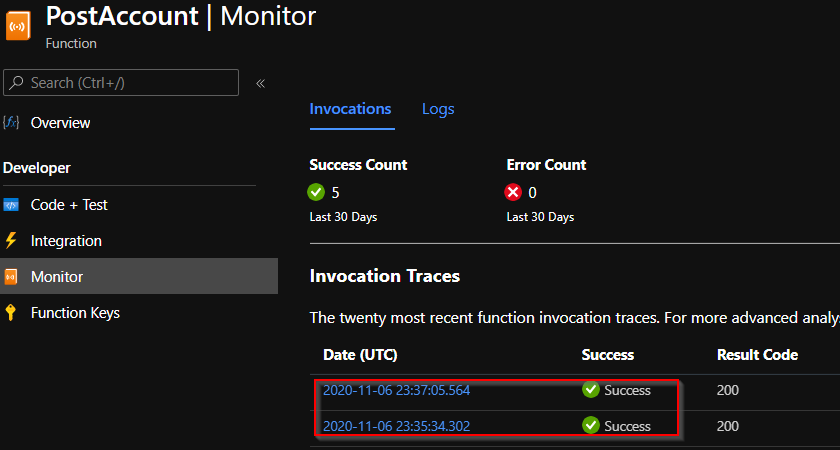
We can now ensure that the Azure Function is triggered by going to the Azure portal and checking the history (you can also view the traces generated by the Azure Function in real time using the Log tab).
By slightly modifying the Azure Function you can add a trace to display the content of the request:

Call using Webhook registration
Now that we’ve seen how to make a call using a plugin, we’ll see how to do the same thing using webhooks!
In technical terms, a webhook is a POST request sent to a URL as the plugin we have just seen, but the URL is always public, which is problematic because it does not include authentication.
The use of webhooks is often used to send information related to a specific event, one of the best-known examples is for example email campaigns. Webhooks are often used to allow us to receive events related to the sending of our emails, such as “open email”, “clicked email”, “clicked email button”, “unsubscribe” etc… And so in this scenario it is obvious that strong authentication cannot be used.
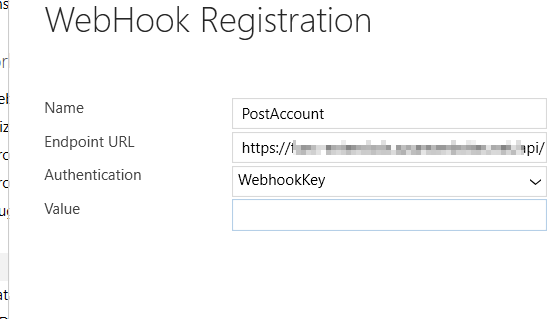
To register a WebHook, it’s quite simple, just use the Plugin Registration Tool once again and register a new WebHook!
We will then be asked for several pieces of information:
- Name: Used to display the name in the PRT.
- Endpoint URL: URL we will trigger.
- Authentication: In our case WebHookKey but we could use another parameter but, in this case, the Azure Function should imperatively be in Anonymous.
- Value: The code that will identify the call to the AF.
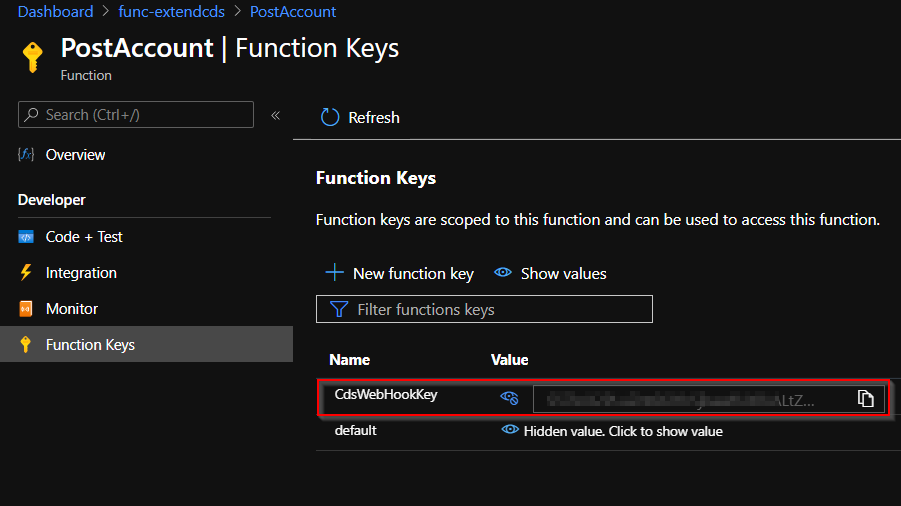
To retrieve the key, called “Function Key”, all you must do is to open the appropriate tab. In our case, we will use a key that we will create. It is obviously not recommended to use the default one.
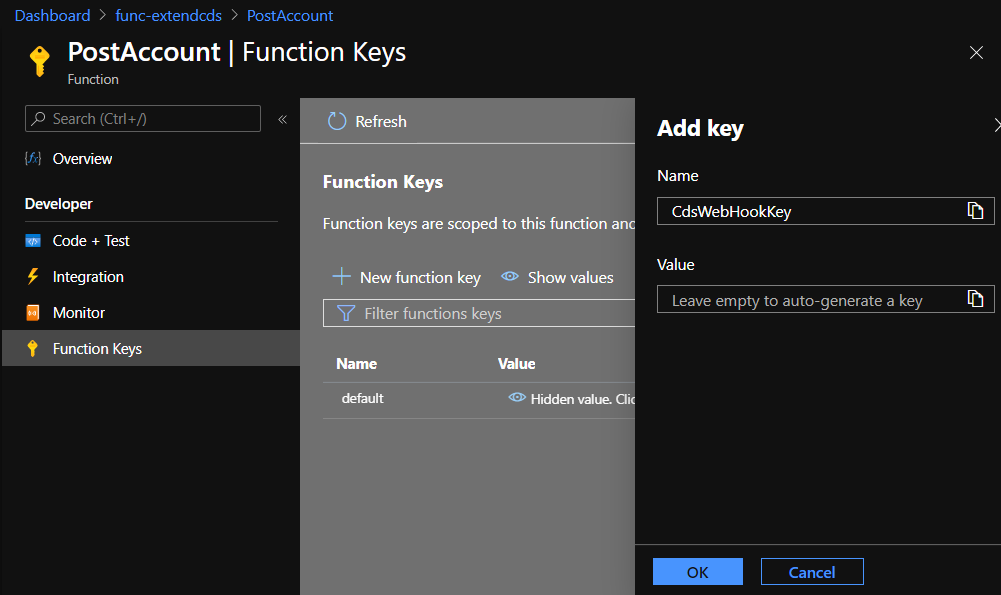
Once created, be sure to copy the automatically generated value.
We can now finalize the registration of the WebHook!
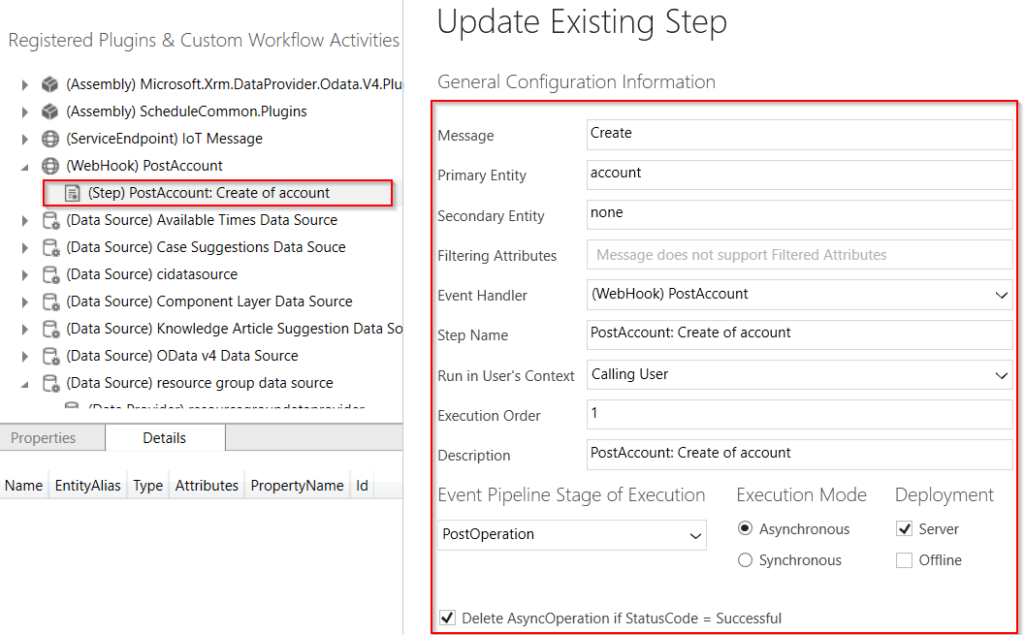
You will notice that I have not specified a PostImage at this stage! We will perform a test by creating an account which will trigger our plugin and webhook.
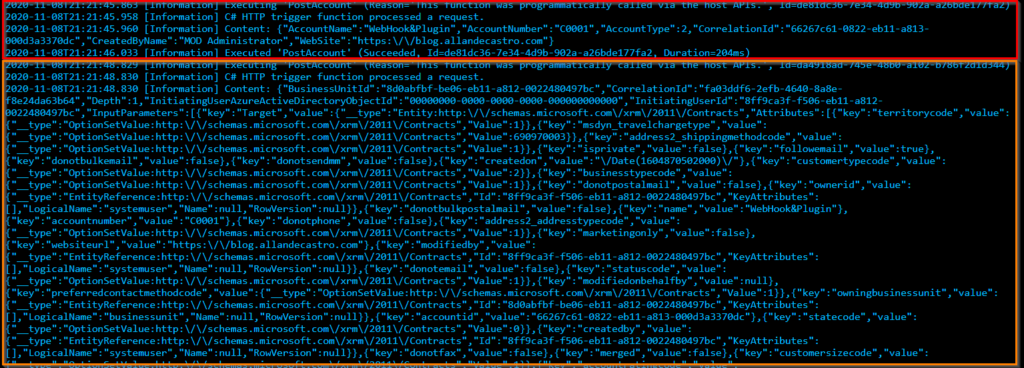
We can see that the plugin was executed first then the webhook was triggered. What is interesting here is to see that for the WebHook the content includes all the execution context!
We also notice that there is no information in the PostImage, which is coherent because we didn’t register it, but we have access to all the fields that are initialized by default, which is also logical because we are in a creation process, so we do have these fields in the Target Entity, we wouldn’t have the same behaviour in the context of an update!
We can easily deserialize the message content to obtain a “RemoteExecutionContext” object and thus retrieve our Target entity! To do so, we simply need to use the SDK and implement a function for this:
        /// <summary>
        /// Method used to Deserialized RemoteExecutionContext
        /// </summary>
        /// <param name="contextJSON">CDS Context as string.</param>
        /// <returns></returns>
        private static RemoteExecutionContext GetContext(string contextJSON)
        {

            RemoteExecutionContext remoteExecutionContext = null;
            using (MemoryStream ms = new MemoryStream(Encoding.Unicode.GetBytes(contextJSON)))
            {
                DataContractJsonSerializer ser = new DataContractJsonSerializer(typeof(RemoteExecutionContext));
                remoteExecutionContext = (RemoteExecutionContext)ser.ReadObject(ms);
            }
            return remoteExecutionContext;
        }
We can therefore access the information very easily in the following way (note that I have added the PostImage in the meantime):

            RemoteExecutionContext cdsContext = GetContext(requestBody);
            log.LogInformation("Context Deserialized.");
            Entity target = (Entity)cdsContext.InputParameters["Target"];
            if (target != null)
                log.LogInformation("Account Name: " + target.GetAttributeValue<string>("name"));
            if (!cdsContext.PostEntityImages.Contains("PostImage"))
                log.LogWarning("Configuration Error: no postimage with name PostImage is defined.");
            else
            {
                Entity postImageEntity = cdsContext.PostEntityImages["PostImage"];
                if (postImageEntity != null && postImageEntity.GetAttributeValue<EntityReference>("createdby") != null)
                    log.LogInformation("Account Created By: " + postImageEntity.GetAttributeValue<EntityReference>("createdby").Name);
            }
And so we observe the following result:

To close this post, we could see how to implement an Azure Function, for an outgoing integration scenario, in two different ways via an Http call (using two different packages) and via the use of a webhook.
My opinion on these two options is that it all depends on the context and the different issues you encounter but I would more easily opt for a call via a plugin because you can really control what is sent (definition of a custom JSON) and therefore minimize the information you send and that you will have to deal with afterwards (more information that transits is also equal to an increase in Azure consumption and therefore a higher price). In case we implement a reusable logic on several systems it will be easier to manage a common JSON schema than different execution contexts.
Note that if you use webhooks you will need to add special steps in your automated deployment process and this also brings security issues about how the call is made, even if the call is made on the server side the use of a key does not secure the Azure Function. You may also have a more complex code in case you want to retrieve information from other entities such as a contact related to this account where in this case you will need to retrieve the information from the Azure Function and so authenticate to the CRM using an Application User.
In the next article we will look at the Incoming scenario for creating contacts.
Leave your comment to Cancel Reply