In this new episode, we will go into a little more detail on the design of a component. Before continuing to read this article, I advise you to read the three previous ones:
- Prelude : Getting started with PowerApps Component Framework
- Episode 1: First Steps!
- Episode 2: Focus on … Control Manifest file!
The objective will therefore be to study the functioning and life cycle of the components.
Framework Interface as Socket
If there is one thing to remember and understand about this Framework before embarking on its design it is that each component created will implement the framework which will itself provide the component with a precise life cycle and its context (metadata, data…).
In my article Getting started with PowerApps Component Framework, I showed a diagram from a Microsoft presentation that perfectly explains this concept!

What we have to understand here is that the component will have to correspond to a certain model and therefore respect the life cycle imposed on it. Moreover, it will be the application that will send the data and metadata to the component and not the other way around, which is a performance gain because we will not need to request the application to retrieve data and in the same way we will not have to make a request if we want to change the value of a field that is present on this entity.
Another advantage is that the components are an integral part of the page’s DOM, while a web resource is added later in the DOM.
At the moment, it is necessary to understand that everything is a component. In fact, the page we see is nothing more than an assembly of components (fields, grid etc…).
Life Cycle Management
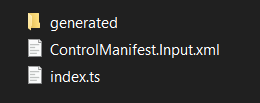
When we have generated a project via CLI, a typescript file ( index.ts) is automatically created and once opened we notice that it is far from empty!
In the typecript file there are 4 functions that determine this execution pipeline.
- init (Required)
- updateView (Required)
- getOutputs (Optional)
- destroy (Required)
The name being quite explicit, you will easily understand that the first function (init) allows you to initialize the component. It is therefore the first function that will be called by the component, hence the fact that it is required. Then, we will find the updateView function that will be triggered as soon as the properties have changed (i.e. the field or the data set related to this component).
Finally, this component can be destroyed from the DOM by calling the destroy function, which will end the life cycle of the component. It is in this function that we will have to close all listeners or pending requests etc…
However, you may be wondering what this getOutputs function is for and why it is optional. The latter will be called when the output values are modified but be careful, we must ourselves notify the framework that the outputs of this control have changed with the notifyOutputChanged instruction.
Note that if you use the components only for viewing information and not necessarily to modify the data, you will not need to use the latter.
To simplify all this, here is a summary diagram:

Example with field template
Let’s say you want to create a component bound to a field.
The init() function will therefore allow you to:
- retrieve the values of each of your parameters
- create your HTML container (the input for example) and associate the different events to it (onclick, change etc…)
The updateView() function will contain the logic you want to implement, display in your input element the resulting value of your logic and finally notify the host that the value has changed.
Be careful because for each field component it will be necessary to check that the user has the reading and writing rights! You can read the following post: It’s time to add some finishing touches to your PCF controls!

Leave a Reply